Aramex Woocommerce User Instructions
How to use the Aramex App in your store
The app allows merchants to easily book shipments using their Aramex account while within the WooCommerce admin. Details from the customer order for size and weights are used both for quoting in the checkout and as prefilled info for placing a booking. Bookings are fully integrated into the order fulfillment process, updating the customer orders with tracking details. Merchants can choose from multiple services. Bulk booking is available for multiple orders to book and label at once.
1. Showing Aramex shipping rates at checkout
To enable rates at checkout you need to add this plugin to your Shipping Zones. Shipping Zones can be configured in the “Shipping” tab within the WooCommerce Settings menu.

Product weight is required

2. Manage Accounts
You can manage your accounts from Settings > Accounts.
From the settings page you can add/edit account details, update other settings, add/edit package details & Manage Aramex Products/Services.

3. Manage Orders
You can manage the order list from Manage Order > Orders.
From the order list you can view order details & book shipment, track shipment & print label

4. Book Shipments
Once the order view is opened, quotes will be displayed on the left side for the various aramex services and the order details are displayed on the right. Also on the right are the destination and sender addresses, as well as the amount paid for shipping along with the service selected by the customer. A merchant may use the Package Dimensions and weight drop down to make any edits to the parcel size, and refresh before making the booking.

Once the booking is made, a button will display for downloading the label.


5. Fulfillment, Notification and Tracking
Once the order has been booked, the WooCommerce order will be updated to Fulfilled, the tracking number and link inserted on the order and the customer will automatically be notified of these details.
6. Shortcut to book from WooCommerce Order Page
A merchant can jump straight in to booking a shipment from the WooCommerce Order Details page by opening the order, on the right side menu is the section for “Joovii Aramex Shipment Option”. This link will take you to the booking screen for the order.

7. Settings
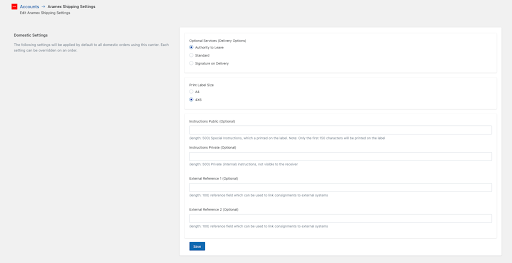
There are a number of universal settings that can be applied in the App to for use across the app. This is accessed via the cog icon in the Account page.

Selecting the cog icon provides the following options grouped by Domestic Settings and International settings.
Delivery options:
This allows the merchant to set a default option for Delivery options such as Authority leave vs Signature required. These will have an impact on the prices quoted, and can be changed on an order by order basis in the Extra options drop down on each order detail page.

Label Size:
Print Label size can also be set with A4 and 4×6 (A6) options available. This determines the size of the labels available for download once a shipment is booked.
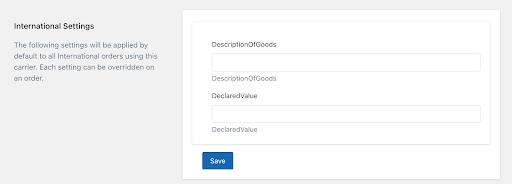
International Settings:
Here a generic description of the goods in the shipment can be set which is used across all international orders customs declarations, along with a declared value.
Likewise these can be overridden in the individual orders.

8. Trouble Shooting
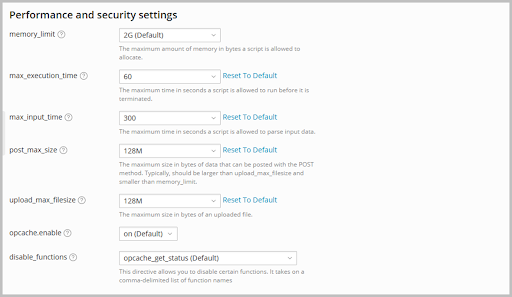
To ensure that orders and quotes are able to make the round trip between the plugin and aramex please ensure the following server settings are applied.
Check the following server settings to prevent curl execution time out:

max_execution_time = 60
max_input_time = 300
memory_limit = 256M
post_max_size = 128M
upload_max_size = 128M
If you receive a Shop ID or Security Code not found error please whitelist the Joovii IP. Instructions can be found Here.


