For Aramex to send from different locations, these are handled by sub accounts. You would need to have sub accounts already created for the different dispatch locations.
Once you have the sub accounts active you can add these addresses to the App and edit the address on orders as needed.
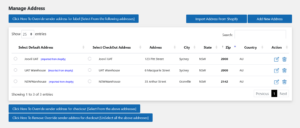
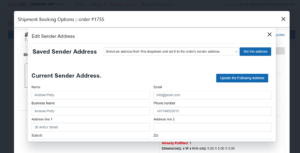
If so you can add these to the app and select which is to apply by editing the sender address in each order. Find the order and click view order and book shipment.
Scroll down to Sender Address and click edit. You will see the drop down and be able to select the Sender address.
The address comes from your Aramex account. You can’t ship from an alternate location like Sendle or CP or Auspost, your pickup is locked to your Aramex account address.
The only option therefore, is to change your address with Aramex (not just in the Aramex portal) but your whole account’s official address.
We don’t specifically support returns it in the app. You would need to sort the return out in your carrier account.
To arrange a return through Aramex, you’ll need to initiate the return process on the Aramex website, using the original tracking number (label number) and recipient’s postcode. Once the return label is generated, you can either arrange a pickup or drop off the package at a designated location.
If you have booked an Aramax pickup and have created it incorrectly you need to follow the below steps to cancel it.
Log into your Aramax account and select consignments>>>view recent
Find the consignment and press delete. (This only has delete if it has not been picked up)
Go to your shopify admin , find the order and change the status to unfulfilled.
Go into the Joovii App, go into the order and you will now have the wording delete under the booking details
- Log into Shopify: Access your Shopify admin panel.
- Go to the Sendle App: Navigate to Apps and select Sendle.
- Select an Order:
- In the Sendle app, find the order you want to ship. You should see a list of all your orders that have been processed through the Sendle integration.
- Click on the order you wish to ship.
- Generate the Shipping Label:
- Review the order details and confirm the shipping information (address, dimensions, and weight).
- Click the button to create or generate the shipping label. The Sendle app will process the label based on the information provided and the service type selected.
- Print the Shipping Label:
- Once the label is generated, you’ll have the option to download or print it directly.
- Click the Print Label button to open the print dialog. You can print the label using your printer.
Additional Tips
- Ensure Printer Compatibility: Make sure your printer settings are compatible with label printing formats (e.g., 4×6 inches).
- Reprinting Labels: If you need to reprint a label, you can go back to the order in the Sendle app and find the label to reprint.
This process allows you to manage and print shipping labels directly within Shopify using the Sendle app, streamlining your fulfillment process.
- Log into Your Shopify Admin:
- Access your Shopify admin panel.
- Go to the Shopify App Store:
- In your Shopify admin, click on Apps in the left sidebar.
- Click on the Shopify App Store button to search for the integration app.
- Search for Jooviis Multi-Carrier Shipping App.
- Select and Install the App:
- Joovii offers a free trial for 14 days. Click Add App and follow the prompts to install it in your Shopify store.
If you need a tutorial please click Here
- Log into Your Shopify Admin:
- Access your Shopify admin panel.
- Open the Joovii App:
- In the left-hand sidebar, click on Apps and select Joovii from your list of installed apps.
- Set Up or Connect Your Australia Post Account:
- If you haven’t already connected your AusPost account, you may need to do this first:
- Navigate to the Settings or Carrier Accounts section within the Joovii App.
- Enter your Australia Post account credentials and API key. You can obtain the API key from your MyPost Business or Australia Post account portal.
- If you haven’t already connected your AusPost account, you may need to do this first:
- Access the Shipments or Orders Section:
- Within the Joovii App, find the section labeled Orders.
- You should see a list of your orders that are ready for shipment.
- Select the Order You Want to Ship:
- Click on the order for which you want to book a shipment. Review the order details and confirm that the customer’s shipping address and product information are correct.
- Book the Shipment:
- Within the order details, look for the option to Book Shipment or Create Label.
- Select Australia Post as the shipping carrier.
- Enter any additional information required, such as package dimensions and weight.
- Confirm the Shipping Options:
- Choose the desired Australia Post service (e.g., standard, express).
- Review the shipping cost and estimated delivery time.
- Generate the Shipping Label:
- Once you confirm the shipment details, click on the Generate Label button.
- The app will process the information and generate a shipping label for the order.
- Print the Shipping Label:
- After the label is generated, you can download and print it directly from the app. Attach the label to the package.
For the App to show live Auspost rates in your checkout , you need to have Carrier Calculated Shipping enabled.
Carrier Calculated Shipping must be enabled for your store to access and display shipping rates.
To be eligible, your Shopify plan must meet both of the following requirements:
1. It is on the Shopify plan or higher. (Not Basic Plan)
2. Your Shopify plan is changed to paid annually.
Once both of the above is true, please contact Shopify support who will enable it immediately when requested.